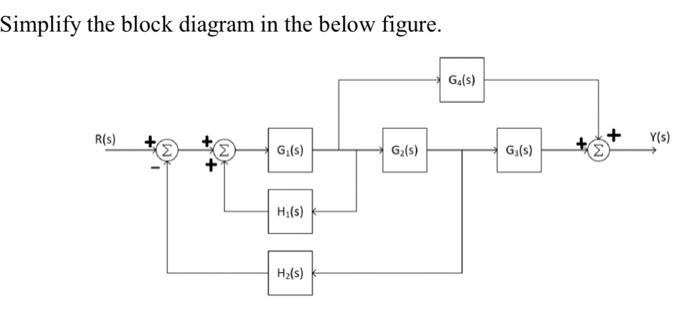
Solved Simplify The Block Diagram In The Below Figure
Solved Simplify The Block Diagram In The Below Figure
If this picture is your intelectual property (copyright infringement) or child pornography / immature images, please Contact Us for abuse. We will follow up your report/abuse within 24 hours.
Related Images of solved simplify the block diagram below and determine

Solved Simplify The Block Diagram Below To Find The Relationship Between X And Y Hs Xs Gs
Solved Simplify The Block Diagram Below To Find The Relationship Between X And Y Hs Xs Gs
Solved Simplify The Block Diagram Shown In Figure 2 To Chegg 28560 Hot Sex Picture
Solved Simplify The Block Diagram Shown In Figure 2 To Chegg 28560 Hot Sex Picture

Solved Block Diagram Simplification 1 Simplify The Block
Solved Block Diagram Simplification 1 Simplify The Block

Solved Exercise 10 Simplify The Block Diagram Shown In Figure Below
Solved Exercise 10 Simplify The Block Diagram Shown In Figure Below
Simplify The Block Diagram Shown In The Figure Obtain
Simplify The Block Diagram Shown In The Figure Obtain

Solved Simplify The Block Diagram Shown In Figure 4 A
Solved Simplify The Block Diagram Shown In Figure 4 A

Solved 3 Simplify The Block Diagram In Fig 1 Fig 1
Solved 3 Simplify The Block Diagram In Fig 1 Fig 1

Solved Simplify The Block Diagram In The Below Figure
Solved Simplify The Block Diagram In The Below Figure
Solved B Simplify The Block Diagram Figure 5 Given Below
Solved B Simplify The Block Diagram Figure 5 Given Below
Solved A Simplify And Determine For The Block Diagram Of
Solved A Simplify And Determine For The Block Diagram Of

Solved 1 Simplify The Block Diagram Shown In The Figu
Solved 1 Simplify The Block Diagram Shown In The Figu
Solved Simplify The Block Diagram Shown Below And Obtai
Solved Simplify The Block Diagram Shown Below And Obtai
Solved 4 Simplify The Block Diagram Shown In Figure 10 65
Solved 4 Simplify The Block Diagram Shown In Figure 10 65

Solved Block Diagram And Transfer Function Simplify The B
Solved Block Diagram And Transfer Function Simplify The B
Solved 1 Simplify The Block Diagram Shown In Fig 1 Then
Solved 1 Simplify The Block Diagram Shown In Fig 1 Then

Solved Simplify The Block Diagram Shown Below Then Obta
Solved Simplify The Block Diagram Shown Below Then Obta

Solved Question 1 Simplify The Block Diagram Shown Below
Solved Question 1 Simplify The Block Diagram Shown Below

Solved 1 Simplify The Block Diagram Shown In The Figu
Solved 1 Simplify The Block Diagram Shown In The Figu
Simplify The Block Diagram Shown In The Figure Obtain
Simplify The Block Diagram Shown In The Figure Obtain
Solved Simplify The Block Diagrams Shown Below Then Obtain
Solved Simplify The Block Diagrams Shown Below Then Obtain
Solved Assignment Simplify The Block Diagrams Shown Below
Solved Assignment Simplify The Block Diagrams Shown Below
Solved Simplify The Block Diagram And Find The Output
Solved Simplify The Block Diagram And Find The Output
Solved Simplify The Block Diagrams Shown Below And Obtain
Solved Simplify The Block Diagrams Shown Below And Obtain

Solved Question 3 Simplify The Block Diagram Seen In Figure
Solved Question 3 Simplify The Block Diagram Seen In Figure

Solved Simplify The Block Diagram Shown In Figure 10 92 And
Solved Simplify The Block Diagram Shown In Figure 10 92 And
Solved Simplify The Following Block Diagram And Determine
Solved Simplify The Following Block Diagram And Determine
Solved 1 Simplify The Block Diagram Shown Below Then
Solved 1 Simplify The Block Diagram Shown Below Then

Solved 3 Simplify The Block Diagram Below Then Obtain The Closed Loop Transfer Function Cr
Solved 3 Simplify The Block Diagram Below Then Obtain The Closed Loop Transfer Function Cr

Solved Simplify The Block Diagram Shown Below Using Block
Solved Simplify The Block Diagram Shown Below Using Block

Solved Simplify The Block Diagram Shown In Figure 3 50 And
Solved Simplify The Block Diagram Shown In Figure 3 50 And
Solved 1 Simplify The Block Diagram Shown In The Figu
Solved 1 Simplify The Block Diagram Shown In The Figu
Solved Simplify The Block Diagram To Find The Equivalent
Solved Simplify The Block Diagram To Find The Equivalent
Solved C Simplify The Block Diagrams Below So That We
Solved C Simplify The Block Diagrams Below So That We
