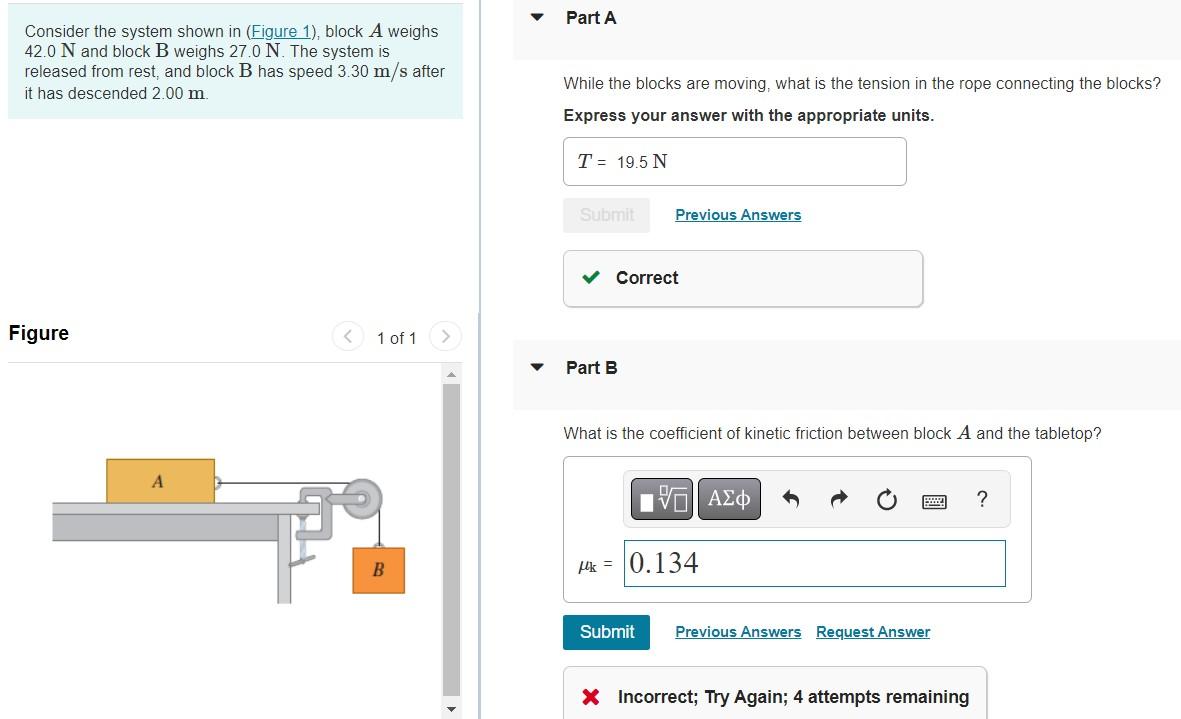
Solved Consider The System Shown In Figure 1 Block A
Solved Consider The System Shown In Figure 1 Block A
If this picture is your intelectual property (copyright infringement) or child pornography / immature images, please Contact Us for abuse. We will follow up your report/abuse within 24 hours.
Related Images of solved question 3 25 marks consider the block diagram shown in figure q3a a laser

Solved Question 3 25 Marks Consider The Block Diagram Shown In Figure Q3a A Laser
Solved Question 3 25 Marks Consider The Block Diagram Shown In Figure Q3a A Laser

Solved Question 3 25 Marks A In The Figure Q3a The
Solved Question 3 25 Marks A In The Figure Q3a The

Solved Question 3 25 Marks A Figure Q3a Comprises Of Two
Solved Question 3 25 Marks A Figure Q3a Comprises Of Two

Solved Problem 1 Using The Block Diagram Reduction
Solved Problem 1 Using The Block Diagram Reduction

Solved 3a Figure Q3a Shows The Block Diagram Of A Control
Solved 3a Figure Q3a Shows The Block Diagram Of A Control
Solved Question 3 25 Marks Consider The Frame Shown In
Solved Question 3 25 Marks Consider The Frame Shown In
Solved Question 3 25 Marks The Table Below Provides
Solved Question 3 25 Marks The Table Below Provides

Solved Question 3 25 Marks The Block Diagram Of The Antenna Azimuth Control System Consists
Solved Question 3 25 Marks The Block Diagram Of The Antenna Azimuth Control System Consists
Solved Problem 1 Simplify The Block Diagram And Obtain T
Solved Problem 1 Simplify The Block Diagram And Obtain T


Solved Q3 A Figq3a Is A Block Diagram Of An Amplifier With
Solved Q3 A Figq3a Is A Block Diagram Of An Amplifier With

Solved Question 3 Lihat 25 Marks Simplify The Block
Solved Question 3 Lihat 25 Marks Simplify The Block

Solved Figure Q3a Shows The Block Diagram Of A Control System By Course Hero
Solved Figure Q3a Shows The Block Diagram Of A Control System By Course Hero

Solved Question 3 25 Marks Use Examples From The Extract
Solved Question 3 25 Marks Use Examples From The Extract

Solved Question 2 Simplify The Block Diagram Shown In The Following Figure And Obtain The
Solved Question 2 Simplify The Block Diagram Shown In The Following Figure And Obtain The

Solved Simplify The Block Diagram Shown In Figure Q3 And
Solved Simplify The Block Diagram Shown In Figure Q3 And

Solved Simplify The Block Diagram Shown In Figure 1 And
Solved Simplify The Block Diagram Shown In Figure 1 And

Solved Consider The System Shown In Figure 1 Block A
Solved Consider The System Shown In Figure 1 Block A
Solved Given The Block Diagram Of Figure Q3a Use Block
Solved Given The Block Diagram Of Figure Q3a Use Block

Solved Find Transfer Function Using Block Diagram Please Solve Both Course Hero
Solved Find Transfer Function Using Block Diagram Please Solve Both Course Hero


Solved Question 3 25 Marks A Consider The Boundary Layer
Solved Question 3 25 Marks A Consider The Boundary Layer
Solved Page 5 Given The Block Diagram Shown In Figure Q3a
Solved Page 5 Given The Block Diagram Shown In Figure Q3a

Solved Question 3 25 Marks Consider Again The Linear
Solved Question 3 25 Marks Consider Again The Linear

Solved Question 3 25 Marks A Consider The Boundary Layer
Solved Question 3 25 Marks A Consider The Boundary Layer
Solved Question 3 25 Marks A Convert The Following
Solved Question 3 25 Marks A Convert The Following

Solved Question 3 25 Marks Consider X X 2 Solutioninn
Solved Question 3 25 Marks Consider X X 2 Solutioninn

Solved 3 25 Marks Consider The Following System Of
Solved 3 25 Marks Consider The Following System Of

Solved Consider The Block Diagram In The Following Figure
Solved Consider The Block Diagram In The Following Figure
Solved 8 Consider A System Represented By The Block Diagram
Solved 8 Consider A System Represented By The Block Diagram

Solved Question 2 Cs 21 Reduce The Block Diagram Shown In Figure Q21 To A Single Transfer
Solved Question 2 Cs 21 Reduce The Block Diagram Shown In Figure Q21 To A Single Transfer
